Introduction
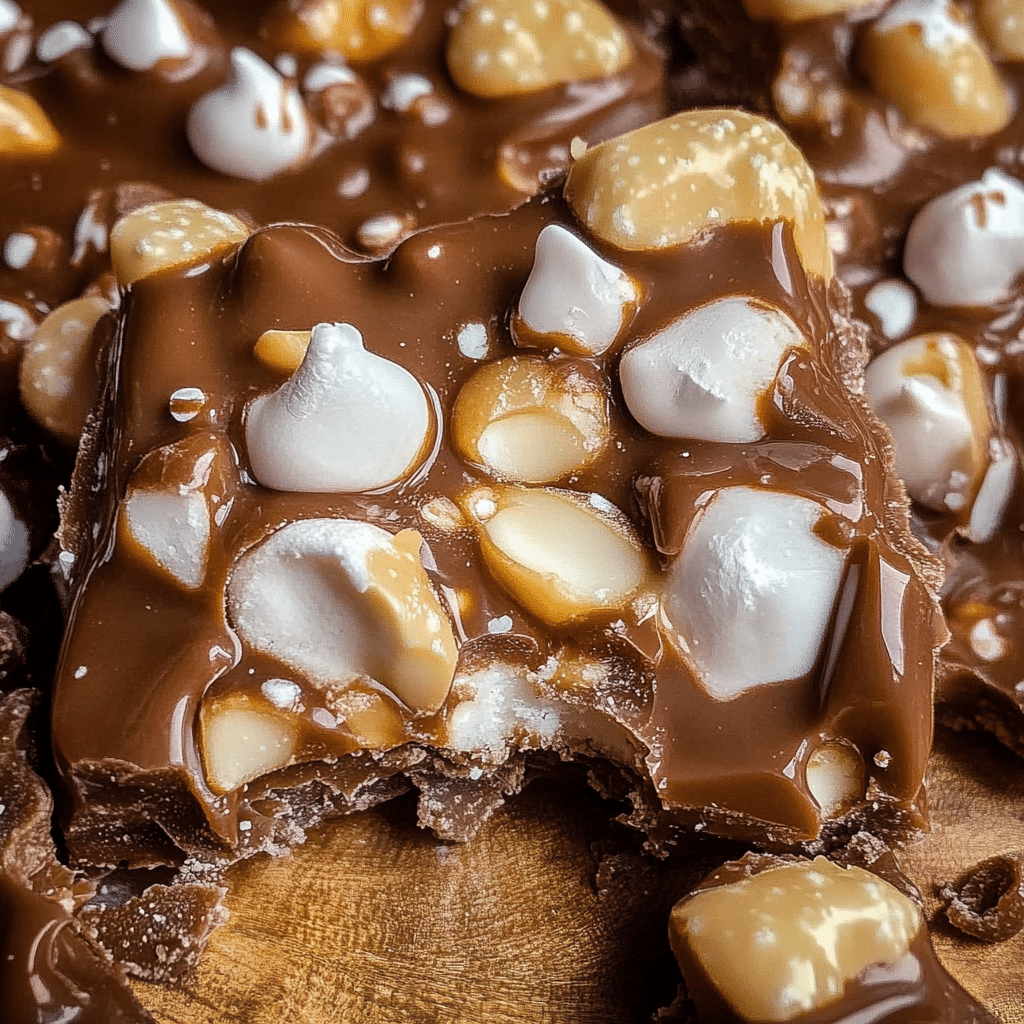
One of the things I love most about Rocky Road Candy is that it brings people together. Over the years, it’s become our go-to treat for family gatherings, and each of us has our own favorite way to enjoy it. My dad always goes for the edge pieces where the chocolate is extra thick, while my mom loves the bites packed with marshmallows. My kids? Well, they go straight for the nutty clusters and always seem to “sample” a few pieces before it even sets! I think that’s what makes this recipe so special—it’s fun and a little messy, and everyone gets to sneak a taste as we put it together.
And honestly, this candy is foolproof! Even if you’re just starting out in the kitchen or making this with kids, it’s hard to go wrong. The steps are so simple, and the flexibility means there’s plenty of room for creativity. Want to add extra marshmallows or try a mix of dark and milk chocolate? Go for it! Prefer almonds over walnuts? Toss them in! It’s one of those recipes that encourages you to make it your own, so you’re not just making candy—you’re creating something a little unique each time.
One tip I’ll share is to line your pan with parchment paper before pouring in the chocolate mixture. This trick makes it so much easier to lift the candy out in one piece, which means neat, easy slicing when it’s set. And don’t rush the cooling time! Letting it sit in the fridge gives the chocolate a nice snap and makes those chunky bites even more satisfying. So go ahead, gather up those ingredients, and dive in—you’re about to create a treat that’s sure to become a new favorite in your household!

Why You’ll Love This Recipe
Here’s why Rocky Road Candy will become one of your favorite treats:
- Easy to Make: Requires only a few ingredients and no oven, making it quick and convenient.
- Perfect for Gifting: Package these in cute boxes or bags for thoughtful homemade gifts.
- Kid-Friendly: Kids will love helping to stir and pour!
- Versatile and Customizable: You can easily switch up the ingredients to suit your taste.
- No-Bake Recipe: Great for hot days when you don’t want to turn on the oven.
- Rich and Decadent: The combination of chocolate, nuts, and marshmallows is a classic.
- Great for Holidays and Parties: A crowd-pleaser that everyone will enjoy.
- Minimal Cleanup: One bowl is all you need.
- Stores Well: Make ahead and store for up to a week for easy snacking.
Preparation Time and Cook Time
- Total Time: 1 hour 10 minutes
- Preparation Time: 10 minutes
- Chilling Time: 1 hour
- Servings: 20 pieces
- Calories per piece: Approximately 150 calories
- Key Nutrients: Fat: 8g, Carbohydrates: 17g, Protein: 2g
Ingredients
Gather these ingredients to make Rocky Road Candy:
- 2 cups semi-sweet chocolate chips
- 1 cup butterscotch chips (optional, for extra flavor)
- 3 cups mini marshmallows
- 1 cup chopped nuts (walnuts or almonds work best)
- 1/4 cup butter (for smoother texture)
Ingredient Highlights
- Chocolate Chips: Semi-sweet chocolate adds just the right amount of richness without overwhelming sweetness.
- Butterscotch Chips: Optional but adds a nice depth of flavor.
- Mini Marshmallows: Adds a chewy texture that complements the chocolate.
- Chopped Nuts: Provides a satisfying crunch, balancing out the chewy and creamy textures.
Step-by-Step Instructions
Follow these steps to create your Rocky Road Candy:
Prepare the Candy
- Melt Chocolate and Butter: In a large microwave-safe bowl, combine chocolate chips, butterscotch chips, and butter. Microwave in 30-second intervals, stirring after each, until smooth.
- Add Marshmallows and Nuts: Gently fold in the mini marshmallows and chopped nuts, making sure everything is evenly coated with chocolate.
- Spread the Mixture: Pour the mixture onto a parchment-lined baking sheet or pan. Spread evenly, smoothing the top with a spatula.
- Chill: Place the pan in the refrigerator for about 1 hour, or until the candy is firm.
Cut and Serve
- Cut into Pieces: Once the candy is set, remove from the refrigerator and cut into squares or bars.
- Serve: Arrange on a plate or pack into bags for gifting.
How to Serve
Here are some fun serving ideas for your Rocky Road Candy:
- Gift Boxes: Place pieces in decorative boxes or tins for holiday gifts.
- On a Dessert Platter: Arrange on a tray with other treats for parties or family gatherings.
- As Snack Bars: Wrap individual pieces for a portable snack.
- Paired with Ice Cream: Serve pieces alongside vanilla or chocolate ice cream for a decadent dessert.
- In Candy Jars: Fill small jars with Rocky Road pieces and set them out as party favors.
- With Hot Drinks: Pair with coffee or hot cocoa for a cozy treat.
- On a Sweets Table: Place on a dessert table as part of a larger spread.
- As Party Favors: Wrap individually with ribbons for party treats.
- For Gifting: Add a personal tag and a festive ribbon for a lovely homemade gift.
- At a Family Gathering: Perfect for potlucks and family gatherings—watch them disappear!
Additional Tips
Maximize your enjoyment of Rocky Road Candy with these helpful tips:
- Line Your Pan: Use parchment paper to make removing and cutting the candy easier.
- Microwave Carefully: Chocolate can scorch, so microwave in short intervals and stir often.
- Customize Nuts: Experiment with different nuts like pecans or cashews for unique flavors.
- Add Extra Goodies: For more texture, try adding shredded coconut or toffee bits.
- Cutting Tip: Use a sharp knife to slice the chilled candy cleanly.
- Store Properly: Keep candy in an airtight container for freshness.
- Add a Pinch of Salt: A sprinkle of sea salt on top enhances the chocolate flavor.
- Work Quickly: Chocolate can harden fast, so have all ingredients ready to mix.
- Adjust Sweetness: Use dark chocolate for a less sweet version.
- Serve Chilled: If it’s warm, keep the candy in the fridge to prevent melting.
Recipe Variations
Consider these creative variations for your Rocky Road Candy:
- White Chocolate Rocky Road: Swap semi-sweet for white chocolate for a sweeter version.
- Tropical Twist: Add dried pineapple, coconut, and macadamia nuts.
- Dark Chocolate Delight: Use dark chocolate for a less sweet, richer candy.
- Nut-Free Option: Skip the nuts and add dried cranberries for a chewy twist.
- Double Chocolate: Use milk and dark chocolate for a layered chocolate flavor.
- Add Crunchy Cereal: Mix in rice cereal for extra crunch.
- Peanut Butter Lovers: Add a drizzle of peanut butter for a nutty twist.
- Sprinkles on Top: Add sprinkles to make the candy festive for holidays.
- Gluten-Free: Ensure all ingredients are gluten-free for a safe treat.
- Spicy Kick: Add a pinch of cayenne for a surprising hint of heat.
Freezing and Storage
Ensure proper storage to maintain the quality of your Rocky Road Candy:
- Storage: Keep candy in an airtight container at room temperature for up to 1 week.
- Refrigeration: In warmer climates, store in the refrigerator to prevent melting.
- Freezing: Rocky Road Candy can be frozen for up to 2 months. Separate layers with parchment paper and store in an airtight container.
- Thawing: Thaw frozen candy at room temperature before serving.
Special Equipment
You may need these kitchen tools to make Rocky Road Candy:
- Microwave-Safe Bowl: For melting the chocolate.
- Mixing Spoon: For stirring chocolate and mixing in marshmallows and nuts.
- Baking Sheet or Pan: To spread and chill the candy.
- Parchment Paper: For easy removal and cleanup.
- Sharp Knife: To cut the candy into pieces.
- Storage Container: Airtight container for storing finished candy.
FAQ Section
Here are answers to common questions about Rocky Road Candy:
- Can I use milk chocolate instead of semi-sweet?
Yes, but the candy will be a bit sweeter. - How long does this candy last?
It can stay fresh for up to 1 week at room temperature in an airtight container. - Can I add dried fruit?
Absolutely! Dried cherries, cranberries, or apricots add a nice chewy texture. - Can I make this ahead of time?
Yes, you can make it a few days in advance and store in the fridge. - How do I prevent chocolate from seizing?
Be careful not to overheat chocolate and avoid getting any water in it.

Rocky Road Candy
- Total Time: 1 hour 10 minutes
Ingredients
- 2 cups semi-sweet chocolate chips
- 1 cup butterscotch chips (optional, for extra flavor)
- 3 cups mini marshmallows
- 1 cup chopped nuts (walnuts or almonds work best)
- 1/4 cup butter (for smoother texture)
Instructions
Prepare the Candy
- Melt Chocolate and Butter: In a large microwave-safe bowl, combine chocolate chips, butterscotch chips, and butter. Microwave in 30-second intervals, stirring after each, until smooth.
- Add Marshmallows and Nuts: Gently fold in the mini marshmallows and chopped nuts, making sure everything is evenly coated with chocolate.
- Spread the Mixture: Pour the mixture onto a parchment-lined baking sheet or pan. Spread evenly, smoothing the top with a spatula.
- Chill: Place the pan in the refrigerator for about 1 hour, or until the candy is firm.
Cut and Serve
- Cut into Pieces: Once the candy is set, remove from the refrigerator and cut into squares or bars.
- Serve: Arrange on a plate or pack into bags for gifting.
- Prep Time: 10 min.
- Cook Time: 1 hr
Nutrition
- Serving Size: 20 pieces
- Calories: 150 kcal
- Fat: 8g
- Carbohydrates: 17g
- Protein: 2g
Conclusion
I’m so excited for you to try this Rocky Road Candy recipe! With its perfect blend of rich chocolate, crunchy nuts, and gooey marshmallows, it’s sure to be a hit. Whether you’re making it for a holiday gathering, a cozy movie night, or just because, this sweet treat is as fun to make as it is to eat. Plus, you can always add your own twist—try mixing in your favorite nuts, dried fruit, or even a sprinkle of sea salt on top for an extra touch!
Once you’ve whipped up your batch, don’t keep it all to yourself—share a little (or a lot) and spread the joy! And I’d love to see how your Rocky Road Candy turns out. Snap a photo and tag me on social media, or leave a comment below to share how you personalized it. I can’t wait to see your creations and hear about your experience making this easy, delightful candy. Enjoy every bite, and happy snacking!
Don’t forget to snap a photo and tag me on social media—I love seeing your delicious creations!

