Introduction
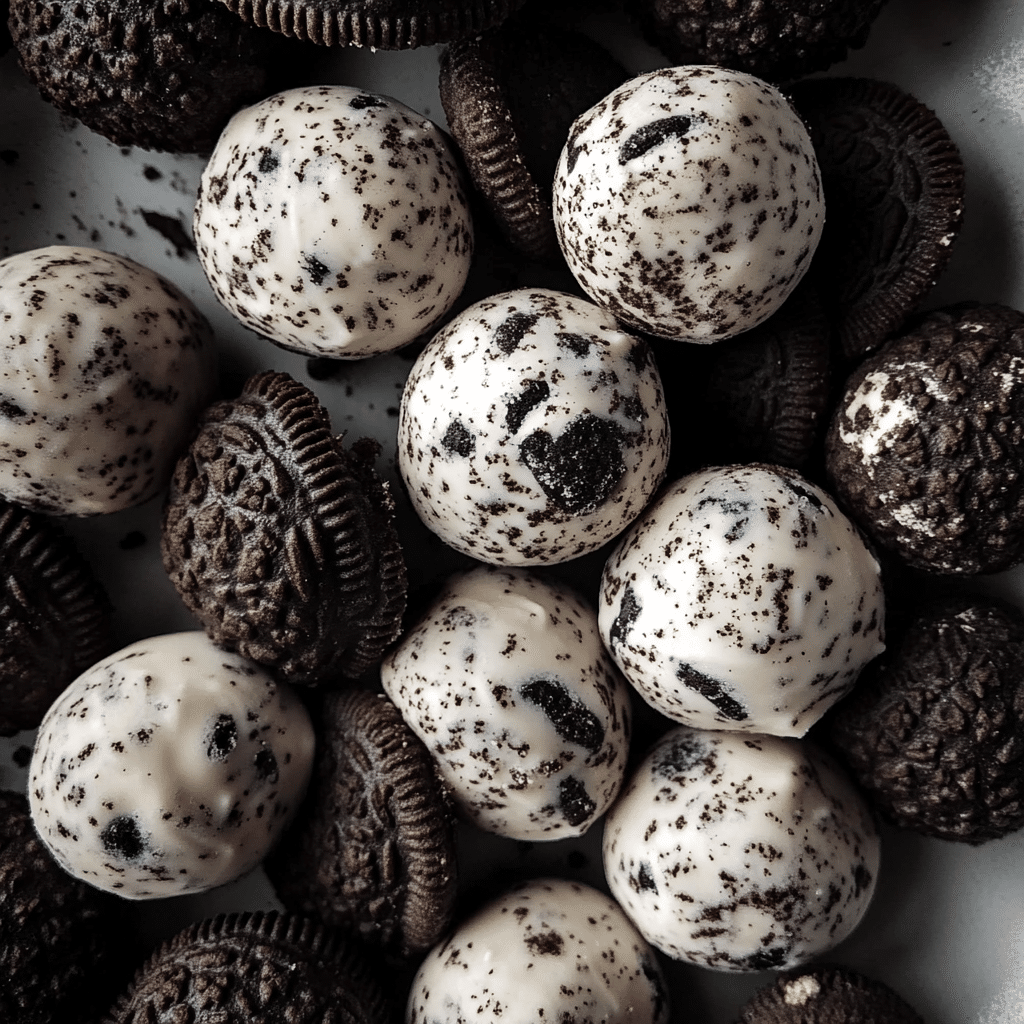
If you’ve been looking for a simple, delicious, and crowd-pleasing treat, look no further than Oreo Balls! These no-bake delights are the perfect blend of creamy and crunchy, made from just a few ingredients that come together in the most delicious way. Whether you’re preparing for a holiday gathering, a family get-together, or a quick indulgence, Oreo Balls are sure to steal the spotlight. The best part? They’re super easy to make, and the result is a sweet, creamy center coated in smooth, velvety chocolate. Prepare for an irresistible combination that’s guaranteed to have everyone reaching for more!
Why You’ll Love This Recipe
There are countless reasons to fall head over heels for Oreo Balls. Here are just a few:
- No-Bake Simplicity: No oven required! Just mix, roll, and chill, and you’re good to go.
- Crowd-Pleaser: These little treats are perfect for parties, gift-giving, or just a quick snack.
- Effortlessly Delicious: With just three ingredients, you can create a flavor-packed dessert that tastes like you spent hours in the kitchen.
- Customizable: Want to get creative? Add your favorite sprinkles, drizzle with white chocolate, or roll in crushed nuts for a personal touch.
- Kid-Friendly: Kids will love helping to crush the Oreos and roll the balls. It’s a fun kitchen activity for all ages!
- Perfect for Any Occasion: Whether it’s a birthday, holiday, or just a sweet treat for the weekend, these Oreo Balls fit the bill.
- Make-Ahead Option: Prepare these ahead of time and store them in the fridge or freezer until you’re ready to serve.
- Mini But Mighty: These bite-sized balls pack a punch of flavor and are the perfect portion for satisfying your sweet tooth.
Preparation Time and Cook Time
- Total Time: 30 minutes (plus chilling time)
- Preparation Time: 20 minutes
- Chill Time: 1 hour
- Servings: 24 Oreo balls
- Calories per ball: Approximately 120 calories
- Key Nutrients: Carbohydrates: 15g, Protein: 1g, Fat: 7g, Fiber: 1g
Ingredients
Here’s what you need to create these delectable Oreo Balls:
For the Oreo Balls:
- 1 package of Oreo cookies (regular or double stuffed)
- 8 oz cream cheese, softened
For the Coating:
- 16 oz chocolate (milk or white chocolate chips, or a mixture of both)
Ingredient Highlights
- Oreo Cookies: These iconic cookies provide the perfect crunch and chocolatey flavor that make the Oreo Balls irresistible.
- Cream Cheese: Cream cheese helps bind the mixture together, creating a smooth, rich center that balances the crunch of the cookies.
- Chocolate Coating: The rich chocolate coating adds sweetness and a glossy finish, making these treats look as good as they taste.
Step-by-Step Instructions
Let’s break it down step by step to create your Oreo Balls:
Crush the Oreos
- Prepare the Oreos: Open the package of Oreos and place the cookies into a large resealable bag or food processor. If you’re using a bag, crush the cookies with a rolling pin until they are finely ground (you want a sand-like texture). If you’re using a food processor, pulse the cookies until they reach a fine crumb consistency.
- Mix with Cream Cheese: Transfer the crushed Oreos into a large bowl. Add the softened cream cheese to the crumbs and mix thoroughly. You can use a spoon or your hands to combine the mixture into a thick, dough-like consistency.
Form the Balls
- Roll into Balls: Using your hands or a small cookie scoop, roll the Oreo-cream cheese mixture into 1-inch balls and place them onto a baking sheet lined with parchment paper. Continue until all the mixture is used up.
Chill the Balls
- Chill: Place the baking sheet with the rolled balls into the refrigerator for at least 1 hour. Chilling helps the balls firm up, making them easier to dip in chocolate later.
Coat the Oreo Balls
- Melt the Chocolate: While the Oreo balls chill, melt your chocolate. You can do this by microwaving the chocolate chips in a microwave-safe bowl in 30-second intervals, stirring in between, until fully melted and smooth. Alternatively, melt the chocolate using a double boiler on the stove.
- Dip the Balls: Once the Oreo balls are chilled, use a fork or toothpick to dip each ball into the melted chocolate. Roll it around gently to coat it fully, then lift it out with a fork, letting any excess chocolate drip off. Place the coated ball back onto the parchment-lined baking sheet.
- Repeat: Continue dipping the remaining balls, making sure each one is evenly coated in chocolate.
Let the Chocolate Set
- Set the Coating: Once all the balls are coated, refrigerate the Oreo balls again for about 30 minutes to let the chocolate harden. This step is key for that perfect crunchy bite when you take a piece.

How to Serve
Here are some creative ways to serve your Oreo Balls:
- Place on a Platter: Arrange the Oreo Balls on a festive platter for an eye-catching dessert spread.
- Give as Gifts: Package these sweet treats in cute gift bags or boxes and hand them out to friends, family, or coworkers.
- Serve with a Dip: Pair your Oreo Balls with a side of chocolate or caramel sauce for extra dipping fun!
- Add to a Dessert Table: Place them alongside other bite-sized desserts for a colorful and varied dessert table.
- Personalize with Sprinkles: Add colorful sprinkles, crushed nuts, or mini chocolate chips on top for an added burst of texture and visual appeal.
- Theme It: For themed parties (like Halloween or Christmas), add colored drizzles or themed sprinkles to match the occasion.
- Snack Attack: Keep a few in a jar on the counter for when a sweet craving strikes.
- Serve at Parties: Whether it’s a birthday, family reunion, or holiday, Oreo Balls will be a hit with guests.
Additional Tips
Here are some pro tips to elevate your Oreo Balls:
- Use Room Temperature Cream Cheese: Make sure the cream cheese is softened before mixing it in with the crushed Oreos. This will help ensure a smooth and creamy filling.
- Chill for Best Results: Chilling the Oreo balls before dipping in chocolate helps them keep their shape and prevents the chocolate from slipping off.
- Experiment with Different Chocolate: You can use dark chocolate, milk chocolate, or white chocolate for coating. For added creativity, drizzle different types of chocolate on top of each ball.
- Roll Tight: When rolling the Oreo balls, make sure they’re compact so that they hold together while dipping and don’t fall apart.
- Use a Double Boiler: If you’re struggling to melt the chocolate evenly in the microwave, use a double boiler method. This can prevent overheating or burning the chocolate.
Recipe Variations
Here are a few variations of Oreo Balls that you might love:
- Mint Oreo Balls: Use mint-flavored Oreos for a refreshing twist.
- Peanut Butter Oreo Balls: Add a tablespoon of peanut butter to the cream cheese mixture for a peanut butter cup-inspired treat.
- Pumpkin Spice Oreo Balls: For a fall variation, mix in a pinch of cinnamon and nutmeg for a cozy, spiced flavor.
- Chocolate Drizzle: After coating the Oreo balls, drizzle a contrasting chocolate over them for a more decorative touch.
- Mini Oreo Balls: Make smaller versions by rolling them into half-inch balls for bite-sized portions.
Freezing and Storage
To make sure your Oreo Balls stay fresh, here’s how to store them:
- Storage: Store in an airtight container in the refrigerator for up to one week.
- Freezing: Oreo Balls can also be frozen for up to 3 months. Place them in a single layer on a baking sheet to freeze, then transfer them to a freezer-safe bag or container. When you’re ready to enjoy, thaw them in the fridge for a few hours.
- Room Temperature: If you’re serving them within a day or two, they can stay at room temperature for a short time, but refrigerating them will keep them fresher for longer.
Special Equipment
Here’s a list of the basic tools you’ll need to make your Oreo Balls:
- Resealable Bag or Food Processor: For crushing the Oreos.
- Baking Sheet: To place while they chill.
- Parchment Paper: To prevent the balls from sticking to the baking sheet.
- Fork or Toothpick: To dip and roll in chocolate.
- Microwave-Safe Bowl or Double Boiler: To melt the chocolate.
FAQ Section
Here are answers to some common questions about Oreo Balls:
- Can I use flavored Oreos?
Absolutely! Experiment with different Oreo flavors like mint, peanut butter, or even birthday cake to create unique versions of these balls. - What can I use if I don’t have cream cheese?
- You can substitute cream cheese with mascarpone cheese or even Nutella for a different flavor profile.
- Can I make these without chocolate?
While chocolate is the traditional coating, you could use candy melts or even a dusting of powdered sugar for a lighter option.

Oreo Balls
- Total Time: 30 min.
Ingredients
For the Oreo Balls:
- 1 package of Oreo cookies (regular or double stuffed)
- 8 oz cream cheese, softened
For the Coating:
- 16 oz chocolate (milk or white chocolate chips, or a mixture of both)
Instructions
Crush the Oreos
- Prepare the Oreos: Open the package of Oreos and place the cookies into a large resealable bag or food processor. If you’re using a bag, crush the cookies with a rolling pin until they are finely ground (you want a sand-like texture). If you’re using a food processor, pulse the cookies until they reach a fine crumb consistency.
- Mix with Cream Cheese: Transfer the crushed Oreos into a large bowl. Add the softened cream cheese to the crumbs and mix thoroughly. You can use a spoon or your hands to combine the mixture into a thick, dough-like consistency.
Form the Balls
- Roll into Balls: Using your hands or a small cookie scoop, roll the Oreo-cream cheese mixture into 1-inch balls and place them onto a baking sheet lined with parchment paper. Continue until all the mixture is used up.
Chill the Balls
- Chill: Place the baking sheet with the rolled balls into the refrigerator for at least 1 hour. Chilling helps the balls firm up, making them easier to dip in chocolate later.
Coat the Oreo Balls
- Melt the Chocolate: While the Oreo balls chill, melt your chocolate. You can do this by microwaving the chocolate chips in a microwave-safe bowl in 30-second intervals, stirring in between, until fully melted and smooth. Alternatively, melt the chocolate using a double boiler on the stove.
- Dip the Balls: Once the Oreo balls are chilled, use a fork or toothpick to dip each ball into the melted chocolate. Roll it around gently to coat it fully, then lift it out with a fork, letting any excess chocolate drip off. Place the coated ball back onto the parchment-lined baking sheet.
- Repeat: Continue dipping the remaining balls, making sure each one is evenly coated in chocolate.
Let the Chocolate Set
- Set the Coating: Once all the balls are coated, refrigerate the Oreo balls again for about 30 minutes to let the chocolate harden. This step is key for that perfect crunchy bite when you take a piece.
- Prep Time: 20 minutes
- Chill Time: 1 hour
Nutrition
- Serving Size: 24 Oreo Balls
- Calories: 120 kcal
- Fat: 7g
- Carbohydrates: 15g
- Fiber: 1g
- Protein: 1g
Conclusion
There you have it – the ultimate Oreo Balls recipe! These treats are simple, versatile, and absolutely irresistible. Whether you’re sharing them at a party, giving them as gifts, or just enjoying them yourself, a sweet treat everyone will love. The best part? They’re so easy to make that you’ll have them ready in no time!
Don’t forget to snap a photo and tag me on social media – I love seeing your delicious creations!

