Introduction
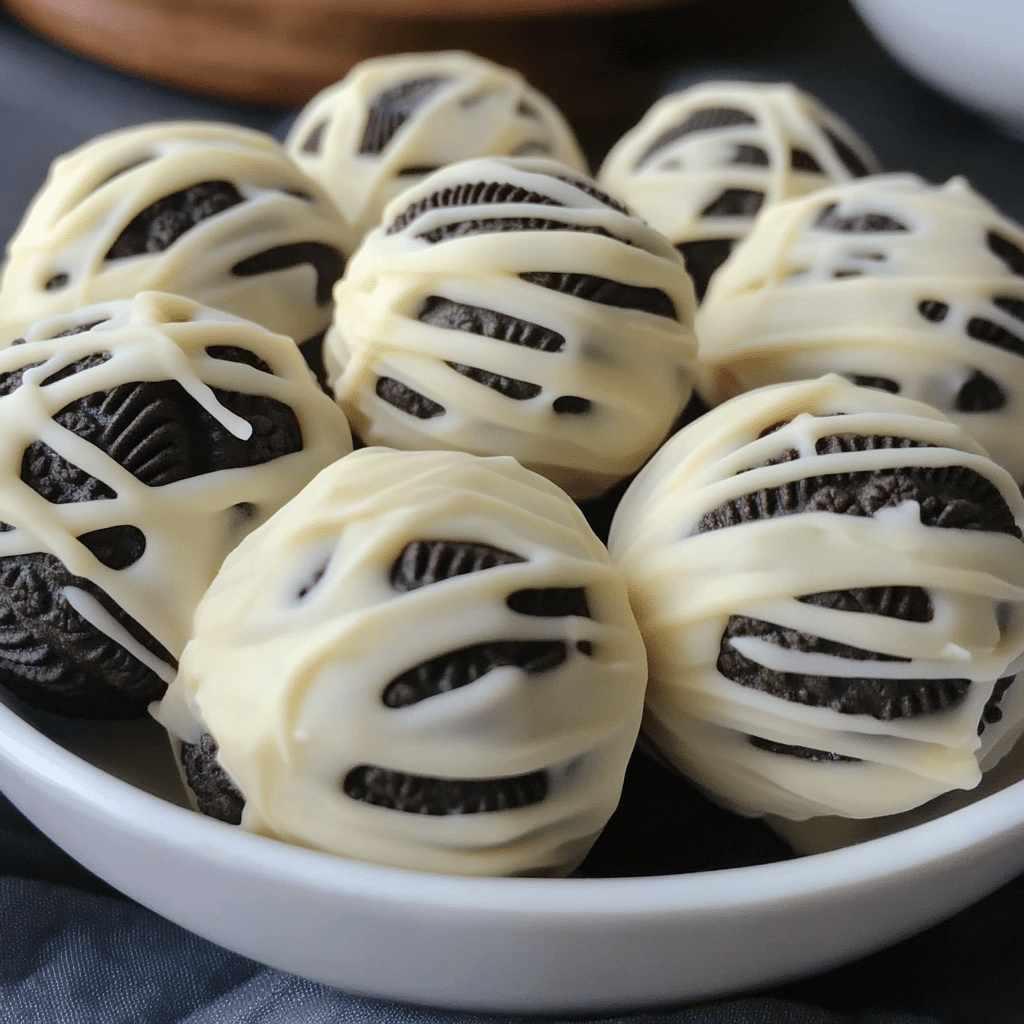
Mummy Oreo Truffles: A Spooktacular Treat
Hey there, friend! If you’re looking for a fun and easy way to get into the festive spirit, you’ve got to try making Mummy Oreo Truffles. Trust me, these little bites of joy are not only super simple to whip up but also packed with that irresistible Oreo goodness everyone loves. I remember the first time I made these for a Halloween party at my kid’s school. They were such a hit that I ended up bringing home just a few crumbs!
The best part? You don’t need to be a baking whiz to nail this recipe. Seriously, if you can crush cookies and melt chocolate, you’ve got all the skills you need! It’s one of those recipes that feels more like a fun project than actual cooking. Plus, the kids can join in on the fun—rolling the truffles and decorating them like little mummies is a great way to spend some quality time together.
With just a handful of ingredients, you’ll create these cute, chocolatey treats that look fancy but are totally approachable. Whether you’re having a spooky gathering or just want a sweet treat to brighten your day, these Mummy Oreo Truffles are sure to impress. They bring back fond memories of festive family get-togethers and the joy of sharing something special. So, gather your supplies, and let’s dive into making these adorable truffles that will become a go-to treat in your household!
Why You’ll Love This Recipe
Here are several reasons to fall in love with Mummy Oreo Truffles:
- Super Easy to Make: With just three ingredients, these truffles are incredibly simple to prepare.
- Fun and Festive: Their cute design makes them a perfect treat for any occasion.
- Decadently Delicious: The combination of Oreos and cream cheese creates a rich and creamy filling.
- No Baking Required: Skip the oven! These truffles are no-bake, saving you time and hassle.
- Kid-Friendly: Kids will enjoy helping to roll and decorate these delightful treats.
- Customizable: Get creative with the decorating—try different colored drizzle or candy eyes!
- Perfect for Any Skill Level: Whether you’re a beginner or a seasoned baker, this recipe is easy to follow.
- Great for Sharing: These truffles are perfect for sharing with friends and family.
- Make-Ahead Option: Prepare them in advance and store them in the fridge for a stress-free treat.
- A Showstopper Dessert: Impress your guests with these charming and eye-catching truffles.
Preparation Time and Cook Time
- Total Time: 45 minutes
- Preparation Time: 20 minutes
- Chilling Time: 25 minutes
- Servings: 24 truffles
- Calories per truffle: Approximately 130 calories
- Key Nutrients: Fiber: 1g, Fat: 7g, Carbohydrates: 15g, Protein: 1g
Ingredients
Gather the following ingredients to create your Mummy Oreo Truffles:
For the Truffles:
- 1 package Oreo cookies (15.35 oz)
- 1 package cream cheese (8 oz), softened
For the Coating:
- 1 cup white chocolate chips (or candy melts)
- Candy eyes (for decoration)
Ingredient Highlights
- Oreo Cookies: These classic cookies provide a rich chocolate flavor that pairs perfectly with cream cheese.
- Cream Cheese: This adds creaminess and helps bind the ingredients, making a delightful filling.
- White Chocolate: The smooth coating not only looks great but adds a sweet touch to the truffles.
Step-by-Step Instructions
Follow these steps to create your Mummy Oreo Truffles:
Make the Truffles
- Crush the Oreos: In a food processor, crush the Oreo cookies into fine crumbs.
- Combine with Cream Cheese: In a large bowl, mix the crushed Oreos with softened cream cheese until fully combined and smooth.
- Form the Truffles: Scoop about a tablespoon of the mixture and roll it into a ball. Repeat until all the mixture is used.
Chill the Truffles
- Refrigerate: Place the rolled truffles on a baking sheet lined with parchment paper and refrigerate for about 25 minutes to firm up.
Coat the Truffles
- Melt the White Chocolate: In a microwave-safe bowl, melt the white chocolate chips in 30-second intervals, stirring until smooth.
- Dip the Truffles: Remove the chilled truffles from the fridge. Dip each one into the melted white chocolate, ensuring it is fully coated. Use a fork to lift them out, letting the excess chocolate drip off.
- Decorate: Place the coated truffles back on the parchment paper. While the chocolate is still wet, add candy eyes and drizzle with additional melted white chocolate to create wraps.
How to Serve
Here are some fun serving ideas for your Mummy Oreo Truffles:
- Display on a Platter: Arrange the truffles on a festive serving tray for an eye-catching display.
- Use Decorative Boxes: Gift them in themed treat boxes for a sweet surprise.
- Pair with Drinks: Serve alongside beverages, like lattes or punch.
- Individual Treats: Place each truffle in a cupcake liner for easy serving.
- Create a Dessert Table: Set up a dessert table with various treats for guests to enjoy.
- Engage Kids: Let kids help with decorating the truffles for a fun and interactive activity.
- Wrap for Gifts: Package truffles in cellophane bags tied with ribbons for fun party favors.
- Include a Tag: Add a cute tag explaining what they are for added fun.
- Add a Sign: Create a sign to label the truffles at your dessert table.
Additional Tips
Maximize your enjoyment of Mummy Oreo Truffles with these helpful tips:
- Use Quality Ingredients: Opt for high-quality chocolate chips for the best flavor.
- Chill for Firmness: Ensure truffles are well-chilled before dipping to keep their shape.
- Experiment with Flavors: Try using different flavored Oreos, like mint or peanut butter, for a fun twist.
- Check for Doneness: Ensure the chocolate is fully melted for smooth dipping.
- Store Properly: Keep truffles in an airtight container in the refrigerator for up to a week.
- Double the Recipe: Consider making a double batch, as these truffles are sure to be a hit!
- Try Different Coatings: Use colored chocolate melts for a more vibrant presentation.
- Add Sprinkles: Use themed sprinkles for extra flair.
- Make Mini Truffles: Roll smaller balls for bite-sized treats.
- Thicker Coating: For a thicker chocolate layer, double dip the truffles after the first layer sets.
Recipe Variations
Consider these creative variations for your Mummy Oreo Truffles:
- Mint Oreo Truffles: Substitute regular Oreos with mint-flavored Oreos for a refreshing twist.
- Peanut Butter Oreos: Use peanut butter Oreos and drizzle with dark chocolate for a rich flavor combination.
- Coconut Flakes: Roll the truffles in shredded coconut before the chocolate sets for a fun texture.
- Dark Chocolate Coating: Use dark chocolate for a more intense flavor contrast.
- Spice it Up: Add a pinch of cinnamon or nutmeg to the cream cheese mixture for added flavor.
- Fruit Fillings: Mix in some crushed freeze-dried fruits for a pop of color and flavor.
- Rice Krispies: Mix in some crushed Rice Krispies for added crunch.
- Mini Truffles: Make smaller versions for a cute, bite-sized treat.
- Filling Variations: Substitute the cream cheese with flavored cream cheese spreads for a unique filling.
- Seasonal Version: Add pumpkin puree and spices to the filling for a seasonal twist.
Freezing and Storage
Ensure proper storage to maintain the quality of your Mummy Oreo Truffles:
- Storage: Keep any leftover truffles in an airtight container in the refrigerator for up to a week.
- Freezing: Freeze truffles in a single layer on a baking sheet, then transfer to a freezer-safe container for up to 3 months.
- Thawing: Thaw frozen truffles in the refrigerator overnight before serving.
- Keep Chilled: Store truffles in the fridge to maintain their shape and freshness.
Special Equipment
You may need these kitchen tools to create your Mummy Oreo Truffles:
- Food Processor: For crushing the Oreo cookies.
- Mixing Bowl: For combining the Oreo and cream cheese mixture.
- Baking Sheet: To place the truffles while they chill.
- Parchment Paper: To line the baking sheet for easy cleanup.
- Microwave-Safe Bowl: For melting the chocolate.
- Fork: To dip the truffles and let excess chocolate drip off.
- Spatula: For spreading melted chocolate or drizzle.
FAQ Section
Here are answers to common questions about Mummy Oreo Truffles:
- Can I use reduced-fat cream cheese?
Yes, reduced-fat cream cheese can be used, but it may alter the texture slightly. - How long can I store the truffles?
They can be stored in the refrigerator for up to a week or frozen for up to 3 months. - Can I freeze these truffles?
Yes, they freeze well if stored properly. - What if I can’t find candy eyes?
You can use chocolate chips or make your own eyes with melted chocolate. - Can I use another type of cookie?
Absolutely! Feel free to experiment with your favorite cookies.
Mummy Oreo Truffles
- Total Time: 45 min.
Ingredients
For the Truffles:
- 1 package Oreo cookies (15.35 oz)
- 1 package cream cheese (8 oz), softened
For the Coating:
- 1 cup white chocolate chips (or candy melts)
- Candy eyes (for decoration)
Instructions
Make the Truffles
- Crush the Oreos: In a food processor, crush the Oreo cookies into fine crumbs.
- Combine with Cream Cheese: In a large bowl, mix the crushed Oreos with softened cream cheese until fully combined and smooth.
- Form the Truffles: Scoop about a tablespoon of the mixture and roll it into a ball. Repeat until all the mixture is used.
Chill the Truffles
- Refrigerate: Place the rolled truffles on a baking sheet lined with parchment paper and refrigerate for about 25 minutes to firm up.
Coat the Truffles
- Melt the White Chocolate: In a microwave-safe bowl, melt the white chocolate chips in 30-second intervals, stirring until smooth.
- Dip the Truffles: Remove the chilled truffles from the fridge. Dip each one into the melted white chocolate, ensuring it is fully coated. Use a fork to lift them out, letting the excess chocolate drip off.
- Decorate: Place the coated truffles back on the parchment paper. While the chocolate is still wet, add candy eyes and drizzle with additional melted white chocolate to create wraps.
- Prep Time: 20 min.
- Cook Time: 25 min.
Nutrition
- Serving Size: 24 truffles
- Calories: 130 kcal
- Fat: 7g
- Carbohydrates: 15g
- Fiber: 1g
- Protein: 1g
Conclusion
Mummy Oreo Truffles are not just a treat; they’re a fantastic way to add a touch of whimsy to any gathering! With their easy preparation and charming design, these little delights are perfect for parties, spooky celebrations, or just a fun afternoon snack at home.
As you roll up your sleeves and dive into making these adorable mummies, I can already imagine the smiles they’ll bring. Whether you’re creating them with the kids or whipping them up for a gathering with friends, they’re sure to be a hit. The combination of chocolate and Oreo filling is always a winner, and the chance to get creative with decorating is just the icing on the cake—literally!
I can’t wait to see how your Mummy Oreo Truffles turn out! Please share your experience in the comments below or snap a photo and tag me on Instagram. I love seeing your delicious creations and how you put your own spin on the recipe! Let’s make this celebration even sweeter together—happy truffling!

