Introduction
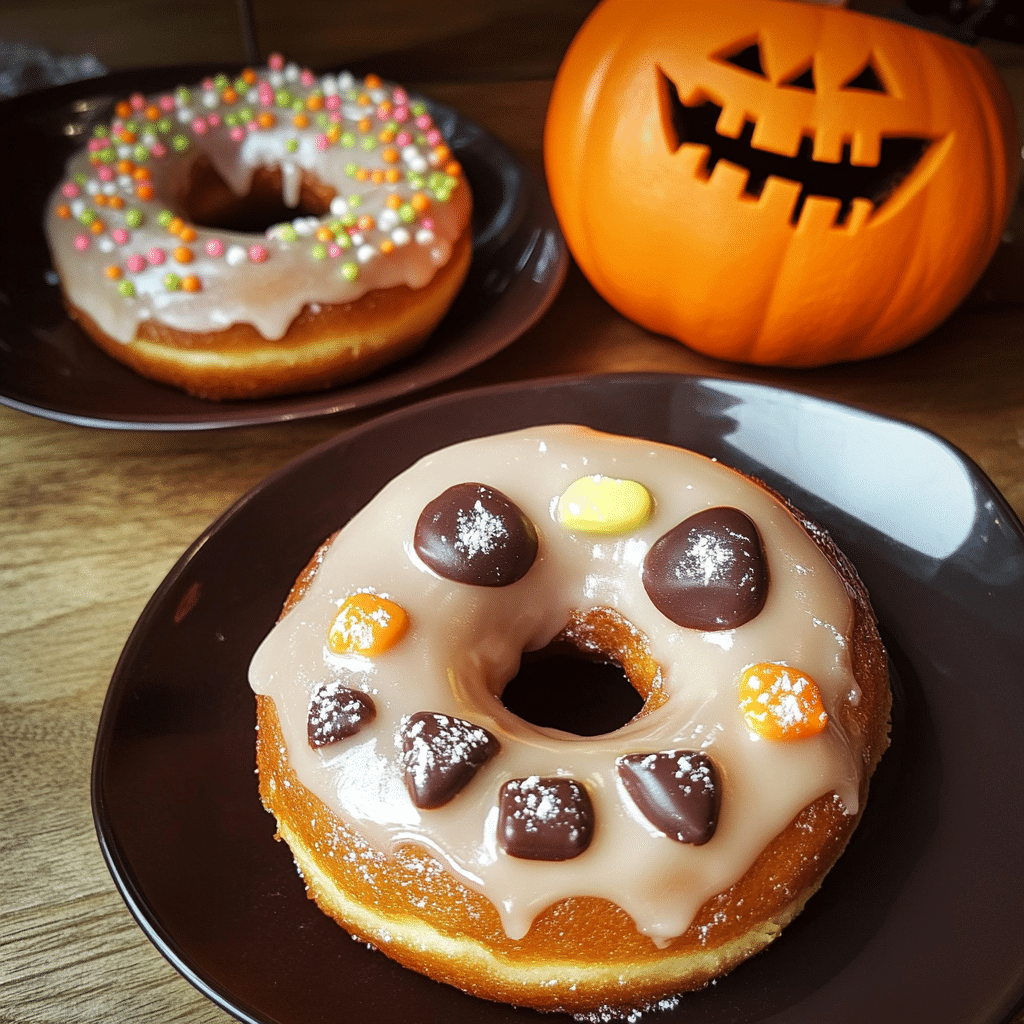
Oh, Halloween! It’s that magical time of year when we get to let our imaginations run wild, and there’s no better way to do that than in the kitchen! These Halloween Donuts are not just treats; they’re a whole celebration of flavors and colors that’ll get everyone in the festive spirit. I can remember making these with my kids, the flour flying everywhere as they mixed the ingredients with the kind of enthusiasm only kids can muster. It always ended up being more about the fun than the final product, but that’s what made it special!
These donuts are perfect for brightening up any Halloween gathering, whether you’re throwing a spooktacular party or just treating yourself to something sweet on a chilly October night. And trust me, you don’t have to be a pro baker to whip these up! With just a few ingredients and some creative toppings, you can make donuts that look like they belong in a bakery window.
What I love most about these donuts is how customizable they are. You can go all out with vibrant icing and sprinkles or keep it simple with powdered sugar. It’s a great way to get the whole family involved—let the kids pick their favorite colors and toppings! Plus, the aroma of fresh-baked donuts wafting through the house is pure autumn bliss.
So, grab your apron, and let’s get started on making some delightful Halloween Donuts that’ll be a hit with everyone! Whether you’re a kitchen newbie or a seasoned chef, I promise you can do this. Let’s make some delicious memories together!
Why You’ll Love This Recipe
Here are several reasons to love these Halloween Donuts:
- Customizable: You can decorate these donuts in countless ways, making each one unique.
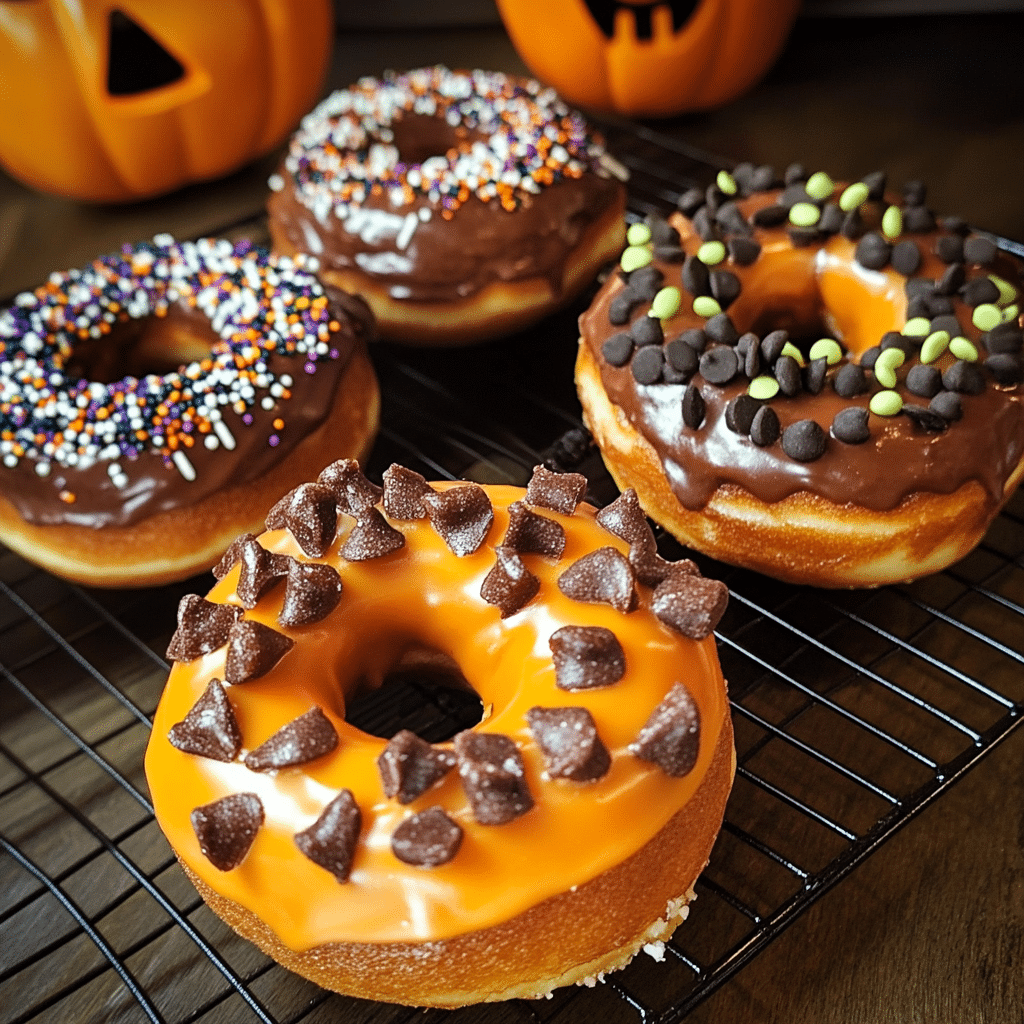
- Festive Colors: Bright orange, purple, and green icing brings the Halloween spirit to life.
- Delicious Flavors: Soft and fluffy donuts with a hint of pumpkin spice or classic vanilla flavor.
- Fun for Kids: Kids can help with decorating, making it a fun family activity.
- Perfect for Parties: These donuts are sure to be a hit at any Halloween gathering.
- Easy to Make: With simple ingredients, whipping up a batch is quick and straightforward.
- Add a Surprise: Stuff them with cream or jelly for a spooky surprise inside!
- Baked or Fried: Choose your preferred method of cooking for a healthier or classic donut.
- Great for Gifts: Package them up for a sweet Halloween treat for friends and neighbors.
- Creative Toppings: Use sprinkles, chocolate chips, or candy eyes to create spooky faces.
Preparation Time and Cook Time
- Total Time: 40 minutes
- Preparation Time: 15 minutes
- Cook Time: 25 minutes
- Servings: 12 donuts
- Calories per donut: Approximately 180 calories
- Key Nutrients: Fiber: 1g, Fat: 7g, Carbohydrates: 26g, Protein: 2g
Ingredients
Gather the following ingredients to create your Halloween Donuts:
For the Donuts:
- 2 cups all-purpose flour
- 1 cup granulated sugar
- 1 tablespoon baking powder
- 1/2 teaspoon baking soda
- 1/2 teaspoon salt
- 1 teaspoon pumpkin spice (optional)
- 1/2 cup whole milk
- 1/4 cup unsalted butter, melted
- 2 large eggs
- 1 teaspoon vanilla extract
the Glaze:
- 2 cups powdered sugar
- 4 tablespoons milk (more if needed)
- Food coloring (orange, purple, and green)
Toppings:
- Halloween sprinkles
- Mini chocolate chips
- Candy eyes
- Crushed Oreos (for a “dirt” effect)
- Whipped cream (for filling)
Ingredient Highlights
- All-Purpose Flour: Provides structure for the donuts.
- Pumpkin Spice: Adds a lovely fall flavor that pairs well with Halloween.
- Food Coloring: Bright and festive colors bring your donuts to life.
Step-by-Step Instructions
Follow these steps to create your Halloween Donuts:
Prepare the Donuts
- Preheat the Oven: Preheat your oven to 375°F (190°C) and grease a donut pan.
- Mix Dry Ingredients: In a large bowl, whisk together the flour, sugar, baking powder, baking soda, salt, and pumpkin spice (if using).
- Mix Wet Ingredients: In a separate bowl, combine the milk, melted butter, eggs, and vanilla extract. Whisk until well combined.
- Combine Mixtures: Pour the wet ingredients into the dry ingredients and mix until just combined. Be careful not to overmix!
- Fill the Pan: Transfer the batter into a piping bag or a zip-top bag with a corner snipped off. Pipe the batter into the greased donut pan, filling each cavity about halfway.
- Bake: Bake for 10-12 minutes or until the donuts spring back when lightly touched. Remove from the oven and let cool for a few minutes before transferring them to a wire rack.
Prepare the Glaze
- Make the Glaze: In a medium bowl, whisk together the powdered sugar and milk until smooth. If the glaze is too thick, add more milk, one tablespoon at a time.
- Divide and Color: Divide the glaze into three bowls and add food coloring to each to create orange, purple, and green glazes.
Decorate the Donuts
- Glaze the Donuts: Dip the tops of the cooled donuts into the colored glaze, allowing the excess to drip off. Place them on a wire rack to set.
- Add Toppings: While the glaze is still wet, sprinkle with Halloween sprinkles, mini chocolate chips, candy eyes, or any other fun toppings you desire.
How to Serve
Here are some fun serving ideas for your Halloween Donuts:
- Display on a Spooky Platter: Arrange the decorated donuts on a Halloween-themed plate or platter for a festive look.
- Create a Donut Tower: Stack them for a fun centerpiece that will draw attention.
- Serve with Milk: Pair with cold milk for a classic combination.
- Set Up a Decorating Station: Have extra toppings available for guests to customize their own donuts.
- Individual Treat Bags: Package them in treat bags for a sweet party favor.
- Accompany with Coffee or Tea: Great for a cozy snack alongside your favorite hot drink.
- Halloween Party Snack Table: Include them on a table with other spooky treats for a complete Halloween spread.
- Share with Neighbors: Bring some to friends or neighbors as a festive gift.
- Use as a Game Prize: Offer them as prizes for Halloween-themed games or contests.
- Photo Opportunity: Encourage guests to take pictures with the donuts for social media fun!
Additional Tips
Maximize your enjoyment of Halloween Donuts with these helpful tips:
- Use a Donut Cutter: If making fried donuts, use a donut cutter for perfectly shaped treats.
- Store Properly: Keep leftovers in an airtight container for up to 3 days.
- Experiment with Flavors: Try adding pumpkin puree or chocolate to the batter for different flavors.
- Make Mini Donuts: Use a mini donut pan for bite-sized versions.
- Use Leftover Glaze: Use any leftover glaze for drizzling over ice cream or other desserts.
- Add Fillings: Fill some donuts with whipped cream or custard before glazing for a surprise.
- Mix the Glaze: Swirl colors together for a fun tie-dye effect on the donuts.
- Chill the Dough: If the batter is too soft to handle, chill it for a bit before piping.
- Adjust Sweetness: Taste the glaze and adjust the sweetness to your liking.
- Try Different Shapes: Use different shaped pans or cookie cutters for variety.
Recipe Variations
Consider these creative variations for your Halloween Donuts:
- Chocolate Donuts: Substitute half of the flour with cocoa powder for chocolate-flavored donuts.
- Gluten-Free Option: Use a gluten-free flour blend for a gluten-free version.
- Maple Flavor: Substitute maple syrup for sugar in the glaze for a delicious twist.
- Apple Cider Glaze: Use apple cider instead of milk in the glaze for a fall flavor.
- Stuffed Donuts: Fill the donuts with jam, custard, or cream cheese before glazing.
- Coconut Topping: Sprinkle shredded coconut on top for a ghostly look.
- Fruit Flavors: Add fruit puree or flavoring to the batter for a fruity twist.
- Spicy Option: Add a pinch of cayenne pepper to the glaze for a spicy kick.
- Nutty Glaze: Stir in crushed nuts or nut butter into the glaze for a crunchy texture.
- Caramel Drizzle: Top the glazed donuts with caramel for an extra indulgent treat.
Freezing and Storage
Ensure proper storage to maintain the quality of your Halloween Donuts:
- Storage: Keep any leftovers in an airtight container at room temperature for up to 3 days.
- Freezing: Donuts can be frozen for up to 2 months. Freeze without glaze, then glaze when ready to eat.
- Thawing: To enjoy, thaw at room temperature or warm them in the microwave for a few seconds.
Special Equipment
You may need these kitchen tools to create your Halloween Donuts:
- Donut Pan: Essential for baking your donuts.
- Mixing Bowls: For combining ingredients.
- Whisk: For mixing batter and glaze.
- Piping Bag: To easily fill the donut pan or decorate the donuts.
- Cooling Rack: For cooling the donuts after baking.
FAQ Section
Here are answers to common questions about Halloween Donuts:
- Can I use a different type of flour?
Yes, you can experiment with whole wheat or gluten-free flour. - How do I know when the donuts are done?
They should spring back when lightly touched and a toothpick should come out clean. - What if I don’t have a donut pan?
You can use a muffin tin for baked donut holes instead. - Can I make these donuts in advance?
Yes, you can bake and freeze them, then glaze them before serving. - What can I use instead of food coloring?
Natural food coloring or fruit purees can be used for color.
Halloween Donuts
- Total Time: 40 min.
Ingredients
For the Donuts:
- 2 cups all-purpose flour
- 1 cup granulated sugar
- 1 tablespoon baking powder
- 1/2 teaspoon baking soda
- 1/2 teaspoon salt
- 1 teaspoon pumpkin spice (optional)
- 1/2 cup whole milk
- 1/4 cup unsalted butter, melted
- 2 large eggs
- 1 teaspoon vanilla extract
For the Glaze:
- 2 cups powdered sugar
- 4 tablespoons milk (more if needed)
- Food coloring (orange, purple, and green)
For Toppings:
- Halloween sprinkles
- Mini chocolate chips
- Candy eyes
- Crushed Oreos (for a “dirt” effect)
- Whipped cream (for filling)
Instructions
Prepare the Donuts
- Preheat the Oven: Preheat your oven to 375°F (190°C) and grease a donut pan.
- Mix Dry Ingredients: In a large bowl, whisk together the flour, sugar, baking powder, baking soda, salt, and pumpkin spice (if using).
- Mix Wet Ingredients: In a separate bowl, combine the milk, melted butter, eggs, and vanilla extract. Whisk until well combined.
- Combine Mixtures: Pour the wet ingredients into the dry ingredients and mix until just combined. Be careful not to overmix!
- Fill the Pan: Transfer the batter into a piping bag or a zip-top bag with a corner snipped off. Pipe the batter into the greased donut pan, filling each cavity about halfway.
- Bake: Bake for 10-12 minutes or until the donuts spring back when lightly touched. Remove from the oven and let cool for a few minutes before transferring them to a wire rack.
Prepare the Glaze
- Make the Glaze: In a medium bowl, whisk together the powdered sugar and milk until smooth. If the glaze is too thick, add more milk, one tablespoon at a time.
- Divide and Color: Divide the glaze into three bowls and add food coloring to each to create orange, purple, and green glazes.
Decorate the Donuts
- Glaze the Donuts: Dip the tops of the cooled donuts into the colored glaze, allowing the excess to drip off. Place them on a wire rack to set.
- Add Toppings: While the glaze is still wet, sprinkle with Halloween sprinkles, mini chocolate chips, candy eyes, or any other fun toppings you desire.
How to Serve
Here are some fun serving ideas for your Halloween Donuts:
- Display on a Spooky Platter: Arrange the decorated donuts on a Halloween-themed plate or platter for a festive look.
- Create a Donut Tower: Stack them for a fun centerpiece that will draw attention.
- Serve with Milk: Pair with cold milk for a classic combination.
- Set Up a Decorating Station: Have extra toppings available for guests to customize their own donuts.
- Individual Treat Bags: Package them in treat bags for a sweet party favor.
- Accompany with Coffee or Tea: Great for a cozy snack alongside your favorite hot drink.
- Halloween Party Snack Table: Include them on a table with other spooky treats for a complete Halloween spread.
- Share with Neighbors: Bring some to friends or neighbors as a festive gift.
- Use as a Game Prize: Offer them as prizes for Halloween-themed games or contests.
- Photo Opportunity: Encourage guests to take pictures with the donuts for social media fun!
- Prep Time: 15 min.
- Cook Time: 25 min.
Nutrition
- Serving Size: 12 donuts
- Calories: 180 kcal
- Fat: 7g
- Carbohydrates: 26g
- Fiber: 1g
- Protein: 2g
Conclusion
These Halloween Donuts are more than just a sweet treat—they’re a delightful way to embrace the fun and excitement of the season! With their vibrant colors and playful toppings, they’re ideal for parties, family gatherings, or simply as a whimsical snack at home. Whether you’re planning a spooky soirée or looking for a fun activity to do with the kids, these donuts are sure to bring smiles and create memorable moments.
I can’t wait for you to try this recipe! As you whip up your batch, let your creativity shine—mix and match toppings or get the little ones involved in decorating. It’s all about having fun and making those precious memories together.
Once your donuts are ready, I’d love to hear about your experience! Did you try a new topping combination? How did they turn out? Please leave a comment below and share your thoughts. And don’t forget to snap a photo of your festive creations and tag me on social media. I absolutely love seeing how your Halloween Donuts turn out and all the unique spins you put on the recipe! So go ahead, get baking, and enjoy every delicious bite. Happy Halloween, and may your kitchen be filled with the sweet aroma of these delightful donuts!

