Introduction
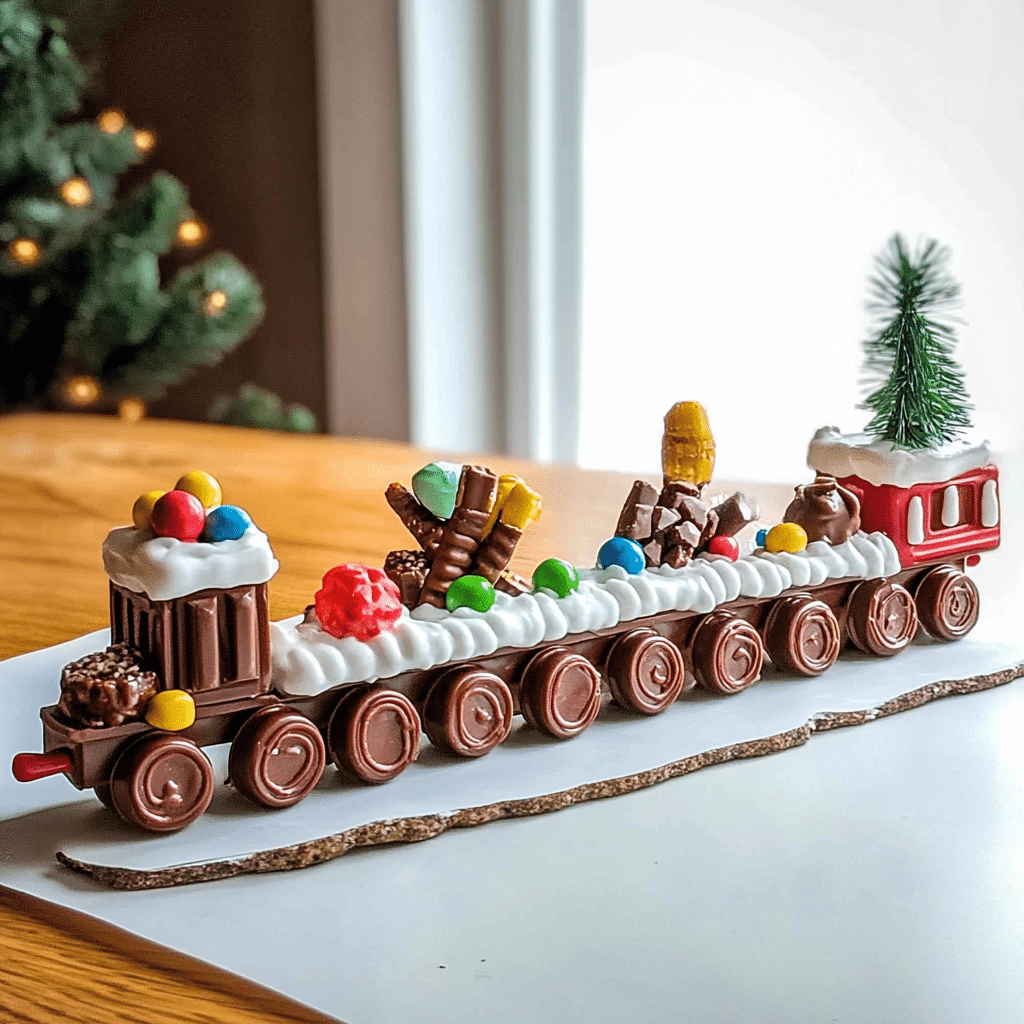
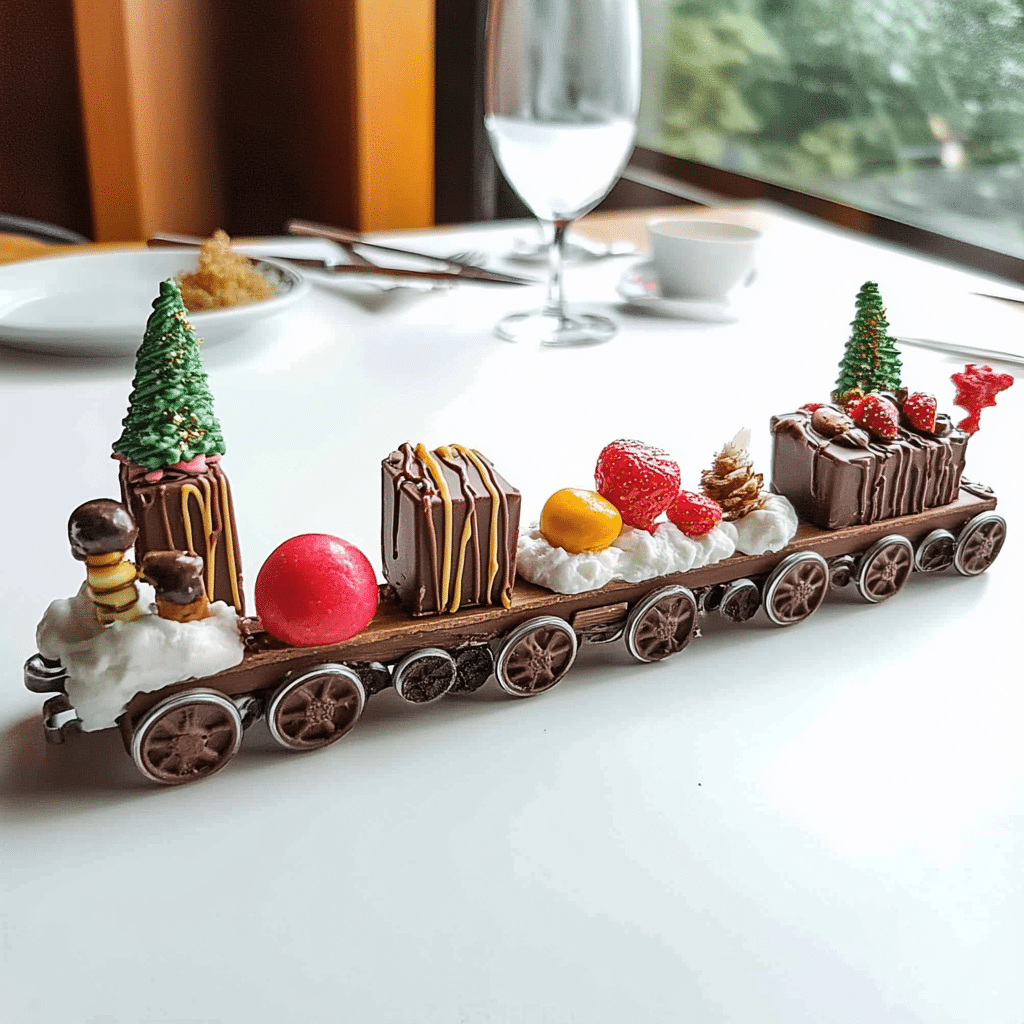
All aboard the sweet express! The Candy Bar Train is the ultimate combination of creativity and deliciousness—a dessert and craft in one! This whimsical treat lets you turn candy bars, cookies, and chocolates into adorable train cars, making it perfect for holiday gatherings, kids’ parties, or as a unique edible gift.
Building your Candy Bar Train is just as fun as eating it! Start with a candy bar base, then use items like marshmallows, mints, and licorice to create wheels, chimneys, and cabooses. Add festive sprinkles or holiday-themed candies for extra charm.
Choose a sturdy base like a classic chocolate bar to serve as the engine or train cars. Use melted chocolate or frosting as edible glue to stick the pieces together. For an extra fun touch, personalize your train by letting the kids pick their favorite candies for a hands-on activity everyone will enjoy.
This project is a delightful way to bring everyone together, combining imagination with a touch of sweetness. Once your candy locomotive is assembled, it makes a fantastic centerpiece or a gift wrapped in cellophane. So, grab your favorite treats, gather the family, and get ready to chug along the tracks of sugary creativity. Your Candy Bar Train is sure to deliver smiles at every stop!
Why You’ll Love This Recipe
Here’s why the Candy Bar Train is a first-class ticket to fun:
- Creative Fun: A perfect blend of crafting and snacking that kids and adults will adore.
- Customizable: Use your favorite candies to make each train unique.
- No Baking Required: A treat you can assemble without turning on the oven.
- Kid-Friendly: A fantastic activity for little engineers to join in.
- Perfect for Gifting: Wrap up your candy trains for an adorable homemade gift.
- Holiday-Ready: A festive addition to any holiday dessert table.
- Quick and Easy: Minimal effort for maximum wow factor.
- Budget-Friendly: Make use of store-bought candies for a cost-effective treat.
- Edible Decoration: Not only delicious but also a show-stopping centerpiece.
- Great for Any Occasion: From birthdays to Christmas, this treat is always in season.
Preparation Time and Assembly Time
- Total Time: 30 minutes
- Preparation Time: 15 minutes
- Assembly Time: 15 minutes
- Servings: Makes 1 train (easily scaled up)
- Calories per train: Approximately 300 calories
- Key Nutrients: Carbohydrates: 45g, Fat: 12g, Protein: 3g
Ingredients
Here’s what you’ll need to create your Candy Bar Train:
- 1 full-size chocolate candy bar (e.g., Hershey’s or Milky Way) – the train’s engine base
- 4 chocolate-covered round candies (e.g., Rolos) – for the wheels
- 1 small chocolate square (e.g., a Hershey’s miniature) – for the cab
- 1 mini candy bar (e.g., a fun-size Snickers) – for the engine
- 1 peppermint candy – for the front of the train
- 1 thin licorice stick – for the chimney
- 1 small gummy candy or jellybean – for the chimney topper
- 1 dab of frosting or melted chocolate – to glue everything together
- Optional decorations: Mini M&Ms, sprinkles, or other small candies
Ingredient Highlights
- Candy Bar Base: The perfect foundation for your train, sturdy and sweet.
- Rolo Wheels: Round, chocolatey, and ideal for that authentic train look.
- Licorice Chimney: Adds height and a touch of whimsy.
Step-by-Step Instructions
Follow these simple steps to build your Candy Bar Train:
Prepare Your Workspace
- Gather Supplies: Lay out your candies, frosting, and tools on a clean surface.
- Prep Your “Glue”: Warm a bit of frosting or melted chocolate to act as your edible adhesive.
Assemble the Train
- Create the Base: Place the full-size candy bar on your workspace as the train’s base.
- Attach the Wheels: Dab a small amount of frosting on the sides of the candy bar and press a Rolo on each corner to form wheels. Hold for a few seconds to secure.
- Build the Cab: Attach the small chocolate square to one end of the candy bar using frosting. This will serve as the cab.
- Add the Engine: Position the mini candy bar in front of the cab to complete the engine look.
- Attach the Chimney: Use frosting to secure the licorice stick vertically on the mini candy bar.
- Top the Chimney: Add a gummy candy or jellybean to the top of the licorice for a playful touch.
- Decorate: Use mini M&Ms, sprinkles, or other small candies to embellish the train as desired.
How to Serve
Here are some fun ways to showcase your Candy Bar Train:
- As a Centerpiece: Line up several candy trains on a festive tray.
- Gift Wrap: Place each train in a clear cellophane bag with a colorful ribbon.
- Party Favors: Hand out individual trains as party takeaways.
- Kids’ Table Décor: Use the trains to decorate a holiday or birthday table.
- Snack Time Surprise: Serve as a creative treat after a meal.
Additional Tips
Make your Candy Bar Train journey smooth with these helpful tips:
- Secure the Wheels: Let the frosting set for a few minutes to avoid wobbling.
- Experiment with Candies: Don’t be afraid to mix and match different types of candy.
- Make It Sturdy: For gifting, use extra frosting or melted chocolate to ensure everything stays in place.
- Keep It Cool: Store your candy trains in a cool, dry place to prevent melting.
- Build in Batches: Create a candy train assembly line for faster production.
Recipe Variations
Get creative with your Candy Bar Train:
- Holiday Train: Use red and green candies for a festive theme.
- Chocolate Lovers’ Train: Incorporate dark chocolate pieces for a richer flavor.
- Rainbow Train: Add colorful candies for a cheerful, kid-friendly look.
- Mini Train Set: Use mini candy bars to create a fleet of tiny trains.
Freezing and Storage
Keep your Candy Bar Train fresh with these storage tips:
- Storage: Store completed trains in an airtight container at room temperature for up to a week.
- Freezing: Avoid freezing as it may affect the texture of the candies.
- Piping Bags and Tips: For adding fancy swirls or designs with your frosting
- .Offset Spatula: Ideal for spreading frosting smoothly onto cupcakes.
- Cookie Cutter: For shaping cookies or decorations if you’re making custom witch hats.
- Cooling Racks: Ensures cupcakes cool evenly before decorating.
- Decorating Tweezers: Helps position small decorations like candy corn with precision.
- Cupcake Carrier: Perfect for transporting your cupcakes safely to parties or events.
- Stand Mixer: A handy tool for mixing batter and whipping frosting effortlessly.
Special Equipment
No special tools are required, but these Candy Bar Train can make assembly easier:
- Toothpicks: For precise application of frosting or melted chocolate.
- Tweezers: To place small candies like mini M&Ms.
- Decorating Bag: For neat frosting application.
- Piping Bags and Tips: For adding fancy swirls or designs with your frosting.
- Offset Spatula: Ideal for spreading frosting smoothly onto cupcakes.
- Cookie Cutter: For shaping cookies or decorations if you’re making custom witch hats.Cooling Racks: Ensures cupcakes cool evenly before decorating.
- Decorating Tweezers: Helps position small decorations like candy corn with precision.
- Cupcake Carrier: Perfect for transporting your cupcakes safely to parties or events.
- Stand Mixer: A handy tool for mixing batter and whipping frosting effortlessly.
- Gel Food Coloring: Adds vibrant colors to frosting or batter without altering the consistency.
- Reusable Silicone Baking Cups: An eco-friendly alternative to paper liners, and they make cleanup a breeze.
- Decorating Turntable: Allows you to easily rotate your cupcake while frosting or decorating.
- Candy Melting Pot: If you want to dip cookies or candies in melted chocolate for extra flair.
- Fine Mesh Sieve: For sifting dry ingredients, ensuring a smooth batter.
FAQ Section
Check out these answers to make sure your candy trees turn out perfect every time!
- Can I use other candy bars as the base?
Absolutely! Try Kit-Kat, Twix, or even granola bars for a different spin. - How long does it take to assemble?
Each train takes about 10-15 minutes, depending on your decorations. - Can I make these with kids?
Yes! It’s a perfect hands-on activity for children. - How do I keep the cookies from getting soggy?
- To keep the cookies crisp, assemble the hats just before serving or store the cupcakes in a cool, dry place.
- Can I make these cupcakes without eggs?
- Yes, you can substitute the eggs with alternatives like applesauce, yogurt, or a commercial egg replacer to make the recipe egg-free.
- What’s the best way to transport these cupcakes?
- Use a cupcake carrier or a sturdy box with individual cupcake slots to prevent them from tipping over during transport.
- Can I use a different cake flavor?
- Of course! Vanilla, red velvet, or even a funfetti base would work wonderfully. Customize it to match your personal taste or party theme.
Candy Bar Train
- Total Time: 30 min.
Ingredients
- 1 full-size chocolate candy bar (e.g., Hershey’s or Milky Way) – the train’s engine base
- 4 chocolate-covered round candies (e.g., Rolos) – for the wheels
- 1 small chocolate square (e.g., a Hershey’s miniature) – for the cab
- 1 mini candy bar (e.g., a fun-size Snickers) – for the engine
- 1 peppermint candy – for the front of the train
- 1 thin licorice stick – for the chimney
- 1 small gummy candy or jellybean – for the chimney topper
- 1 dab of frosting or melted chocolate – to glue everything together
- Optional decorations: Mini M&Ms, sprinkles, or other small candies
Instructions
Prepare Your Workspace
- Gather Supplies: Lay out your candies, frosting, and tools on a clean surface.
- Prep Your “Glue”: Warm a bit of frosting or melted chocolate to act as your edible adhesive.
Assemble the Train
- Create the Base: Place the full-size candy bar on your workspace as the train’s base.
- Attach the Wheels: Dab a small amount of frosting on the sides of the candy bar and press a Rolo on each corner to form wheels. Hold for a few seconds to secure.
- Build the Cab: Attach the small chocolate square to one end of the candy bar using frosting. This will serve as the cab.
- Add the Engine: Position the mini candy bar in front of the cab to complete the engine look.
- Attach the Chimney: Use frosting to secure the licorice stick vertically on the mini candy bar.
- Top the Chimney: Add a gummy candy or jellybean to the top of the licorice for a playful touch.
- Decorate: Use mini M&Ms, sprinkles, or other small candies to embellish the train as desired.
- Prep Time: 15 min.
- Cook Time: 15 min.
Nutrition
- Serving Size: 1 train
- Calories: 300 kcal
- Fat: 12g
- Carbohydrates: 45g
- Protein: 3g
Conclusion
The Candy Bar Train is a whimsical treat that combines crafting and snacking in the sweetest way possible! Perfect for parties, holiday decorations, or even as a creative gift, this fun project is as delightful to make as it is to share. With colorful candies as wheels, a candy bar for the engine, and plenty of opportunities for customization, it’s a guaranteed crowd-pleaser for all ages.
What makes it even better? You don’t need fancy tools—just a little imagination and some tasty supplies to create your masterpiece. Gather your candy, channel your inner engineer, and let the fun begin as you assemble your very own Candy Bar Train.
Don’t forget to snap a photo and tag me on social media—I love seeing your delicious creations and how you make this sweet idea your own!

